 素人プログラマ奮闘記
画面遷移について勉強してみる(1)
Androidで画面を作成するときは、1画面1Activityとなっているため、必要な画面数分の
Activityクラスを継承したクラスと、Android XML ファイル(レイアウト)をセットで作成していきます。
画面遷移にはIntentオブジェクトを使用します。
Intentオブジェクトはデータを受け渡したり別のアプリに移動したりと様々な使い方が可能です。
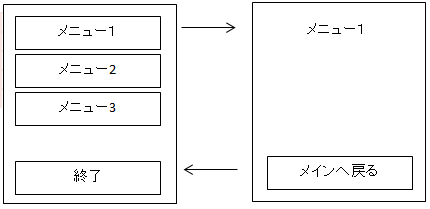
今回は下記のような画面を作成していきます。
1.プロジェクトの作成
プロジェクト名:TestActivitys、アクテビティ名:MainActivity、レイアウト名:main、にして作成します。2.文字列定義
次にアプリで使用する文字列を定義します。(定義方法はStrings.xmlについての勉強を参照)・メニュー1(menu1)
・メニュー2(menu2)
・メニュー3(menu3)
・終了(project_end)
・メインへ戻る(main_return)
3.メニュー画面レイアウト作成
次にメニュー画面(MainActivity)の画面レイアウトを作成します。main.xml
<LinearLayout
    xmlns:android="http://schemas.android.com/apk/res/android"
    xmlns:tools="http://schemas.android.com/tools"
    android:layout_width="match_parent"
    android:layout_height="match_parent"
    android:paddingBottom="@dimen/activity_vertical_margin"
    android:paddingLeft="@dimen/activity_horizontal_margin"
    android:paddingRight="@dimen/activity_horizontal_margin"
    android:paddingTop="@dimen/activity_vertical_margin"
    android:orientation="vertical"
    tools:context=".MainActivity" >

	<LinearLayout
	    android:layout_width="match_parent"
	    android:layout_height="wrap_content"
	    android:orientation="horizontal" >
   	    <Button android:id="@+id/menu1"
        	android:layout_width="fill_parent"
        	android:layout_height="wrap_content"
        	android:text="@string/menu1" />
	</LinearLayout>
	<LinearLayout
	    android:layout_width="match_parent"
	    android:layout_height="wrap_content"
	    android:orientation="horizontal" >
   	    <Button android:id="@+id/menu2"
        	android:layout_width="fill_parent"
        	android:layout_height="wrap_content"
        	android:text="@string/menu2" />
	</LinearLayout>
	<LinearLayout
	    android:layout_width="match_parent"
	    android:layout_height="wrap_content"
	    android:orientation="horizontal" >
   	    <Button android:id="@+id/menu3"
        	android:layout_width="fill_parent"
        	android:layout_height="wrap_content"
        	android:text="@string/menu3" />
	</LinearLayout>
	<LinearLayout
	    android:layout_width="match_parent"
	    android:layout_height="fill_parent"
	    android:orientation="horizontal" >
   	    <Button android:id="@+id/projectEnd"
        	android:layout_width="fill_parent"
        	android:layout_height="wrap_content"
        	android:layout_gravity="bottom"
        	android:text="@string/project_end" />
	</LinearLayout>
</LinearLayout>
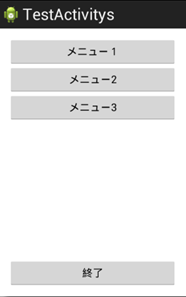
デザインビューで確認すると下記の図のようになります。
ここでのポイントは終了ボタンの属性で指定している、android:layout_gravity="bottom"です。
水平のレイアウトでは、layout_gravityに対し、上(top)、中央(center_vertical)、下(bottom)の設定ができます。
4.画面背景に画像を使う
いつも背景色が白色でさみしいので、画像でも貼り付けてみます。背景画像(backimage.pngを準備して、下記のフォルダに入れてください。
res/drawable-hdpi/backimage.png
後はmain.xmlの一番外側のLinearLayout属性に
android:background="@drawable/backimage"を設定してください。
するとこんな感じになります。

え?デザインセンスがないって?聞こえません~ヽ(´ー`)ノ
今日はここまで!
カテゴリーへ
画面遷移について勉強してみる(2)
前回の画面遷移について勉強してみる(1)の続きです。
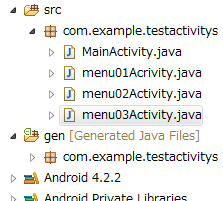
5.メニュー1~3画面作成
メニュー1~3の画面を作成していきます。main.xmlがある場所にmenu01.xml,menu02.xmlファイルを作成します。
layoutフォルダにカーソルを当てて
右クリック>新規>Android XML ファイルをクリックすると
新規 Android XML ファイル作成画面に入ると思います。
作成画面のリソース・タイプとプロジェクトは既に入力されていると思います。 (リソース・タイプがLayout、プロジェクトはその作成中のプロジェクト名)
ファイル名にmenu01を入力後完了ボタンを押してファイルを作成してください
同様にmneu02,menu03も作成してください
次にmenu01.xmlの内容を編集します。
menu01にはテキストと、メインへ戻るボタンを配置します。
<LinearLayout
    xmlns:android="http://schemas.android.com/apk/res/android"
    xmlns:tools="http://schemas.android.com/tools"
    android:layout_width="match_parent"
    android:layout_height="match_parent"
    android:paddingBottom="@dimen/activity_vertical_margin"
    android:paddingLeft="@dimen/activity_horizontal_margin"
    android:paddingRight="@dimen/activity_horizontal_margin"
    android:paddingTop="@dimen/activity_vertical_margin"
    android:orientation="vertical"
    android:background="@drawable/backimage" >
	<LinearLayout
	    android:layout_width="fill_parent"
        android:layout_height="wrap_content"
        android:orientation="horizontal" >
        <TextView
            android:layout_width="fill_parent"
            android:layout_height="wrap_content"
            android::gravity= "center"
            android:textSize="20sp"
            android:text="@string/menu1" />
	</LinearLayout>
	<LinearLayout
	    android:layout_width="fill_parent"
        android:layout_height="fill_parent"
        android:orientation="horizontal" >
    <Button android:id="@+id/menuReturn"
        	android:layout_width="fill_parent"
        	android:layout_height="wrap_content"
        	android:layout_gravity="bottom"
        	android:text="@string/menu_return" />
	</LinearLayout>
</LinearLayout>
ここでのポイントはTextViewのandroid:gravity="center"です。
android:gravityとは、配置場所を変えるための属性です。
ここで使用するのはcenterです、上下左右中央に配置するという意味です。
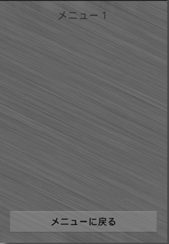
作成できたら、デザインビューで確認してください。
menu01.xmlを参考に、menu02.xmlと、menu03.xmlの内容も編集して、レイアウトを完成させてください。
6.各画面のActivity.java作成
次は、画面に対応するActivity.javaを作成していきます。MainActivity.javaが入っているフォルダで、右クリック>新規>クラスをクリックします。
すると新規 Java クラス作成画面が出てくるので名前にmenu01Activityと入力します。
続いてスーパークラスにandroid.app.Activityを入力して完了ボタンを押下します。
同様に、menu02Activity.javaと、menu03Activity.javaも作成してください。
7.メイン画面のActivity.java編集
メイン画面の操作処理を実装していきます。操作としては、メニュー1~3ボタン押下時の処理と、終了ボタン押下時の処理とintentの設定です。
まずは画面上のボタンを操作するための準備をします。
package com.example.testactivitys;

import android.os.Bundle;
import android.app.Activity;
import android.view.Menu;
import android.widget.Button;

public class MainActivity extends Activity {

	Button menu01Btn = null;
	Button menu02Btn = null;
	Button menu03Btn = null;
	Button projectEndBtn = null;

	@Override
	protected void onCreate(Bundle savedInstanceState) {
		super.onCreate(savedInstanceState);
		setContentView(R.layout.main);

		menu01Btn = (Button)findViewById(R.id.menu1);
		menu02Btn = (Button)findViewById(R.id.menu2);
		menu03Btn = (Button)findViewById(R.id.menu3);
		projectEndBtn = (Button)findViewById(R.id.projectEnd);
	}

	@Override
	public boolean onCreateOptionsMenu(Menu menu) {

		// Inflate the menu; this adds items to the action bar if it is present.
		getMenuInflater().inflate(R.menu.main, menu);
		return true;
	}
}
ここでのポイントはfindViewByIdです。
main.xmlに配置されたコントロールをプログラム内から操作できるようにします。
※ちなみにsetContentView(R.layout.main);が走る前にfindViewByIdをしてもうまく取得できません。
今後ソフトを作成していく上で重要なところなので、使い方を覚えておきましょう。
今日はここまで!次回は 各ボタンのクリックイベント登録からです。
カテゴリーへ
画面遷移について勉強してみる(3)
さて前回からの続きで、各ボタンのクリックイベント登録をします。
クリックイベント登録方法は色々ありますが、
今回はActivityクラスにOnClickListenerインターフェースを実装する方法を採用します。
8.MainActivityにnClickListener実装する
MainActivity.javaに、OnClickListenerを登録します。
package com.example.testactivitys;

import android.os.Bundle;
import android.app.Activity;
import android.content.DialogInterface;
import android.view.Menu;
import android.view.View;
import android.view.View.OnClickListener;
import android.widget.Button;

public class MainActivity extends Activity  implements OnClickListener {

	Button menu01Btn = null;	//メニュー1ボタン
	Button menu02Btn = null;	//メニュー2ボタン
	Button menu03Btn = null;	//メニュー3ボタン
	Button projectEndBtn = null;	//終了ボタン

	@Override
	protected void onCreate(Bundle savedInstanceState) {
		super.onCreate(savedInstanceState);
		setContentView(R.layout.main);

		menu01Btn = (Button)findViewById(R.id.menu1);
		menu02Btn = (Button)findViewById(R.id.menu2);
		menu03Btn = (Button)findViewById(R.id.menu3);
		projectEndBtn = (Button)findViewById(R.id.projectEnd);	//終了ボタン紐つけ


		//ボタンクリック登録
		menu01Btn.setOnClickListener(this);
		menu02Btn.setOnClickListener(this);
		menu03Btn.setOnClickListener(this);
		projectEndBtn.setOnClickListener(this);

	}

	@Override
	public boolean onCreateOptionsMenu(Menu menu) {
		// Inflate the menu; this adds items to the action bar if it is present.
		getMenuInflater().inflate(R.menu.main, menu);
		return true;
	}

	@Override

		public void onClick(View v) {
		// TODO 自動生成されたメソッド・スタブ
		 switch(v.getId()) {
		    case R.id.menu1:
			break;
		    case R.id.menu2:
			break;
		    case R.id.menu3:
			break;
		    case R.id.projectEnd:
			break;
		}

	};
}
インターフェイスのOnClickListenerを実装するとonClickメソッド宣言が自動で追加されます。
このイベント内で各ボタンコントロールのIDによってボタンクリック時の処理を実装します。
あとは、各ボタンにsetOnClickListenerで設定するだけです。
9.intent登録
次は、intentの登録をしていきます。インデントには、明示的インテントと、暗黙的インテントが有ります。
今回は明示的インテントを使用します。
暗黙的インテントについては、また別の機会にでも勉強したいともいます。
では下記のソースを見てください。
	@Override
		public void onClick(View v) {
			// TODO 自動生成されたメソッド・スタブ
			 switch(v.getId()) {
			    case R.id.menu1:
	                //intentの作成

	                intent = new Intent(MainActivity.this,Menu01Activity.class);
	                //intentをスタート
	                startActivity(intent);

				break;
			    case R.id.menu2:

	                //intentの作成
	                intent = new Intent(MainActivity.this,Menu02Activity.class);
	                //intentをスタート
	                startActivity(intent);

				break;
			    case R.id.menu3:

	                //intentの作成
	                intent = new Intent(MainActivity.this,Menu03Activity.class);
	                //intentをスタート
	                startActivity(intent);

				break;
			    case R.id.projectEnd:
				break;
			}
		};
例としてメニュー1ボタンが押された時の場合について説明します。
Menu01Activityのインテントを作成。そのインテントを startActivity メソッドに渡して、Menu01Activityを起動します。
10.Menu01Activity.javaを編集
次は、ほかの画面の実装をしていきます。各メニュー画面では、共通して戻るボタン押下でMain画面へ戻る操作だけができる画面です。
よって戻るボタンイベントの登録とMain画面へ戻るときの、intentの登録の実装です。
(当初この記事を書いている時点では勉強不足で、Main画面へ戻る場合はintentを作り直して(new)ますが、 このやり方はあまりよろしくないです・・Mainに戻るボタン押下で、サブ画面をFinish()させるだけで同じうごきになります。 画面遷移について勉強不足でした。。。)
package com.example.testactivitys;

import android.app.Activity;
import android.content.Intent;
import android.os.Bundle;
import android.view.View;
import android.view.View.OnClickListener;
import android.widget.Button;
import android.widget.TextView;

public class Menu01Activity extends Activity implements OnClickListener{


	Button returnBtn = null;     	//戻るボタン
	TextView titleTxt = null;		//タイトル

	@Override
	protected void onCreate(Bundle savedInstanceState) {
		super.onCreate(savedInstanceState);
		setContentView(R.layout.menu01);


		returnBtn = (Button)findViewById(R.id.menuReturn);		//戻るボタン紐づけ
		titleTxt = (TextView)findViewById(R.id.title);			//タイトルテキスト紐づけ

		returnBtn.setOnClickListener(this);
	}

	@Override
	public void onClick(View v) {
		// TODO 自動生成されたメソッド・スタブ
		Intent intent;
		switch(v.getId()) {
			case R.id.menuReturn:
	           this.finish();
            break;
		}
	}

}
Menu01Activityを参考に、Menu02Activity,Menu03Activityも実装してください。
11.AndroidManifest.xmlにアクティビティを登録
最後に作成したメニュー画面1~3をアンドロイドに認識させるために AndroidManifest.xmlにアクティビティを登録する必要があります。このファイルはアプリケーションに含まれるアクティビティなどに関する設定を定義するファイルと考えて下さい。
プロジェクト内のAndroidManifest.xmlをダブルクリックして開ki AndroidManifest.xmlの中身を下記を参考に編集してください
<?xml version="1.0" encoding="utf-8"?>
<manifest xmlns:android="http://schemas.android.com/apk/res/android"
    package="com.example.testactivitys"
    android:versionCode="1"
    android:versionName="1.0" >

    <uses-sdk
        android:minSdkVersion="8"
        android:targetSdkVersion="17" />

    <application
        android:allowBackup="true"
        android:icon="@drawable/ic_launcher"
        android:label="@string/app_name"
        android:theme="@style/AppTheme" >
        <activity
            android:name="com.example.testactivitys.MainActivity"
            android:label="@string/app_name" >
            <intent-filter>
                <action android:name="android.intent.action.MAIN" />

                <category android:name="android.intent.category.LAUNCHER" />
            </intent-filter>

        </activity>
		<activity
            android:name="com.example.testactivitys.Menu01Activity"
            android:label="@string/app_name" >
        </activity>
		<activity
            android:name="com.example.testactivitys.Menu02Activity"
            android:label="@string/app_name" >
        </activity>
				<activity
            android:name="com.example.testactivitys.Menu03Activity"
            android:label="@string/app_name" >
        </activity>

    </application>

</manifest>
これで完成です!!お疲れ様でした。

カテゴリーへ