 素人プログラマ奮闘記
割り勘ソフトを作成してみる
すでに出回りまくっていますが、「人数」と「金額」を入力し、「計算」 ボタンがある簡単な割り勘計算アプリを作成してみようとおもいます。
開発に使用するのはeclipseです。(Android Studioをインストールしたものの、いまいち使い方がわからなかったため・・)
大まかな仕様
人数:人数入力(入力制限0~99)
金額:金額入力(入力制限0~999999)
計算ボタン:ボタン押下時に入力チェック
結果表示: テキスト表示
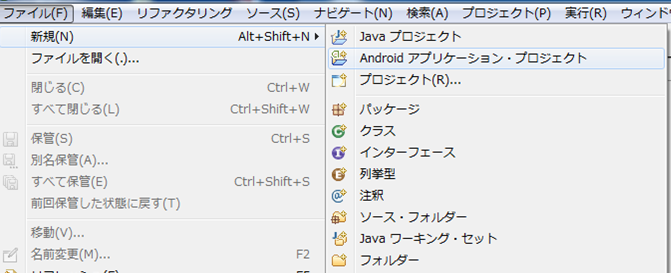
まずはeclipseを立ち上げてファイルから新規作成>Android App作成を選択します。
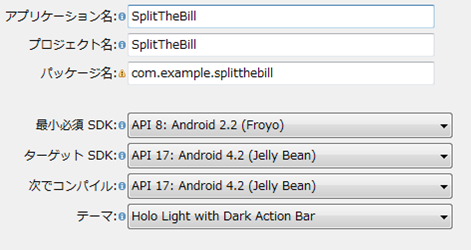
次にアプリケーション名を設定する画面が開くので、今回はSplitTheBill(割り勘?)という名前にしました。
アプリケーション名:アプリの名前です。これは、アプリをダウンロードしてくれたユーザーに見せるための名前です。ここは日本語が使えます。
プロジェクト名:開発者がアプリを管理するための名前です。プログラミングしたデータや、androidアプリに必要なデータが、このフォルダ名でパソコンに保存されます。
パッケージ名:コンピュータから見たアプリの名前です。世界に1つだけの名前にするのが基本らしいです。今回は適当に入れています。
最小必須SDK:サポートするAndroidバージョンの最低値です。
ターゲットSDK:動作保証するAndroidバージョンです。最新バージョンを指定すればいいと思います。
次でコンパイル:コンパイル時に利用するAndroidバージョンです。
テーマ:このスタイルをAndroidアプリ全体の初期値として使用します。
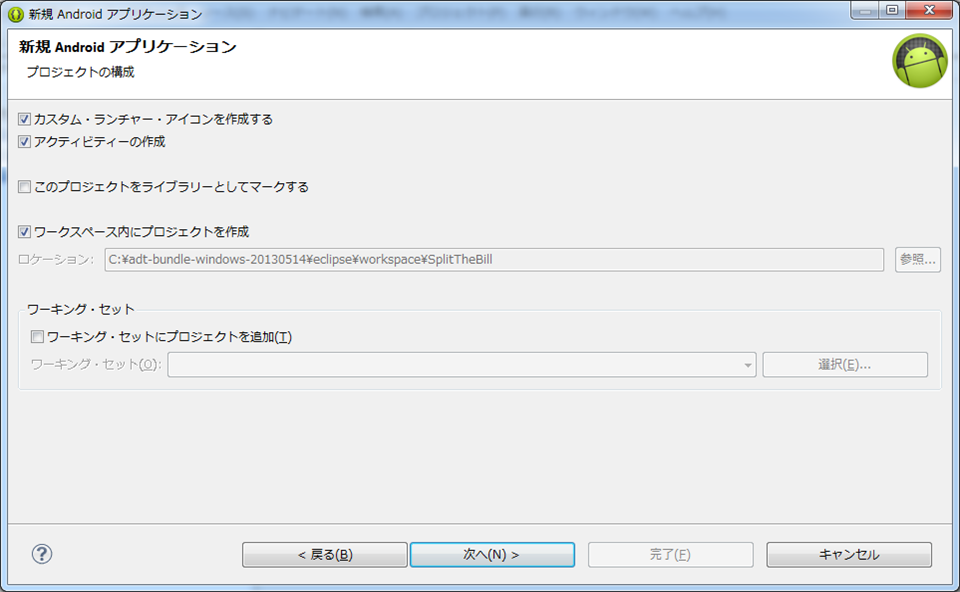
上記の設定をした後、次へボタン押下
この画面以降はデフォルト設定のまま次へボタン押下で完了します。
カスタムランチャーアイコン・・・:プロジェクト作成時にランチャーアイコンを作成するかどうかを指定します。
アクティビティーの作成:プロジェクト作成時にアクティビティを作成するかどうかを指定します。
このプロジェクトをライブラリーとしてマークする:ライブラリーのプロジェクトに設定するかどうかを指定します。
ワーキング・セットにプロジェクトを追加:ワーキングセットにプロジェクトを追加するかどうかを指定します。
まずは画面表示に使用する文字列を、 res/values/strings.xml の中に定義します。
<?xml version="1.0" encoding="utf-8"?>
<resources>
	<string name="app_name">SplitTheBill</string>
	<string name="action_settings">Settings</string>
	<string name="hello_world">Hello world!</string>
	<string name="numPeople">人数:</string>
	<string name="people">人</string>
	<string name="money">金額:</string>
	<string name="yen">円</string>
	<string name="calculation">計算する</string>
	<string name="onePeople">一人の金額:</string>
</resources>
次に画面レイアウトを編集します、 Eclipse上でres/Layout/activity_main.xmlになります。
<?xml version="1.0" encoding="utf-8"?>
<LinearLayout
    xmlns:android="http://schemas.android.com/apk/res/android"
    android:layout_width="match_parent"
    android:layout_height="match_parent"
    android:orientation="vertical">
	<LinearLayout
	    android:layout_width="match_parent"
        android:layout_height="wrap_content"
        android:orientation="horizontal" >
	    <TextView
            android:layout_width="wrap_content"
            android:layout_height="wrap_content"
            android:textSize="20sp"
            android:text="@string/numPeople" />
        <EditText
            android:id="@+id/etxtNumEdit"
            android:layout_width="0dp"
            android:layout_height="wrap_content"
            android:layout_weight="1"
            android:digits="01234567890"
            android:maxLength="2"
            android:inputType="number" />
        <TextView
            android:layout_width="wrap_content"
            android:layout_height="wrap_content"
            android:textSize="20sp"
            android:text="@string/people" />
	</LinearLayout>
	<LinearLayout
	    android:layout_width="match_parent"
        android:layout_height="wrap_content"
        android:orientation="horizontal" >
	    <TextView
            android:layout_width="wrap_content"
            android:layout_height="wrap_content"
            android:textSize="20sp"
            android:text="@string/money" />
        <EditText
            android:id="@+id/moneyEdit"
            android:layout_width="0dp"
            android:layout_height="wrap_content"
            android:layout_weight="1"
            android:digits="01234567890"
            android:maxLength="6"
            android:inputType="number" />
        <TextView
            android:layout_width="wrap_content"
            android:layout_height="wrap_content"
            android:textSize="20sp"
            android:text="@string/yen" />
	</LinearLayout>
	<LinearLayout
	    android:layout_width="match_parent"
        android:layout_height="wrap_content"
        android:orientation="horizontal" >
	    <Button android:id="@+id/calculation"
        android:layout_width="wrap_content"
        android:layout_height="wrap_content"
        android:text="@string/calculation" />

	</LinearLayout>
	<LinearLayout
	    android:layout_width="match_parent"
        android:layout_height="wrap_content"
        android:orientation="horizontal" >
	    <TextView
            android:layout_width="wrap_content"
            android:layout_height="wrap_content"
            android:textSize="20sp"
            android:text="@string/onePeople" />
	    <TextView
			android:id="@+id/moneyText"
            android:layout_width="wrap_content"
            android:layout_height="wrap_content"
            android:textSize="20sp"
            android:text="" />
	    <TextView
            android:layout_width="wrap_content"
            android:layout_height="wrap_content"
            android:textSize="20sp"
            android:text="@string/yen" />
	</LinearLayout>
</LinearLayout>
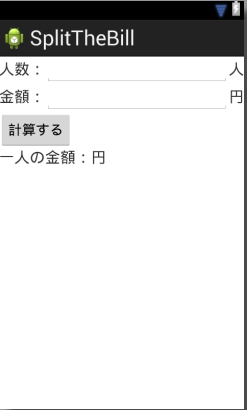
編集後の画面イメージ
各値の入力制限はdigits属性を使用します。
digits属性を定義すると、入力可能な数値、記号の文字セットを指定する。指定した文字以外の入力ができなくなります。
例:android:digits="01234567890"
次にinputType属性で入力する内容に応じたソフトウェアキーボードの設定を行います。
例:android:inputType="number"
最後に「計算」 ボタンをクリックすると計算結果として一人当たりの金額を表示するプログラムを記述します。 処理の実装として、「計算」 ボタンをクリックしたときの処理を記述していきます。
編集対象ファイルはEclipse上でsrc/com.example.splitthebill/MainActivity.javaになります。
---MainActivity.java---
private Button calculationButton;
calculationButton = (Button)findViewById(R.id.calculation);
----------
findViewById ですが、これは activity_main.xmlで定義したボタン等のインスタンスを取得する記述です。 引数には定義したidを指定します。「計算」ボタンには calculation という id を設定したので、R.id.calculation とします。
---MainActivity.java---
public int keisan(int numP ,int numM) { return numM / numP; }
----------
2個の数字を引数で受け取って割り算するkeisan関数を作成します。クリックイベント時に呼び出します。
calculationButton.setOnClickListener(new View.OnClickListener() {
	// ボタンがクリックされた時のハンドラ
	@Override
	public void onClick(View v) {
		// TODO Auto-generated method stub
		// クリックされた時の処理を記述

		// 入力内容を取得
		String numStr   = etxtNumEdit.getText().toString();
		String moneyStr = moneyEdit.getText().toString();

		try
		{
			// 数値に変換
			int num   = Integer.parseInt(numStr);
			int money = Integer.parseInt(moneyStr);

			//計算結果を取得
			int result = keisan(num,money);

			// 結果表示用テキストに設定
			moneyText.setText(Integer.toString(result));
		}
		catch (NumberFormatException e){
		    //
		    //処理:ダイアログを表示します。
		    //
		    AlertDialog.Builder alertDialog =
		    		new AlertDialog.Builder(MainActivity.this);
		    //タイトルを設定する
		    alertDialog.setTitle("計算失敗");
		    //メッセージ内容を設定する
		    alertDialog.setMessage("入力内容が不正です。");
		    //確認ボタンん処理を設定する
		    alertDialog.setPositiveButton("OK",new DialogInterface.OnClickListener() {
		        public void onClick(DialogInterface dialog,int whichButton) {
		            setResult(RESULT_OK);
		        }
		    });
		    alertDialog.create();
		    alertDialog.show();
		}
		Log.v("OnClick", "Button was clicked.");
		}
	});
ボタンが押された時のイベントを受け取るために、setOnClickListener メソッドを使用します。
処理内容は、画面で入力された人数と金額を取得し、keisan関数を使用して、moneyTextに出力しています。
ここまでくればあとはデバッグ画面で動作確認ができます。
カテゴリーへ