 素人プログラマ奮闘記
レイアウト作成 (ストップウォッチ)
今回は簡単なストップウォッチを作成したいと思います。
機能として、スタートボタン、ストップボタン、リセットボタン、現在の時間を表示するようにします。
定期的に処理をするためにTimerクラスをつかいます
詳しくはTimerを使ってみる(1)を参照ください。
ではレイアウトから作成していきます。
AndroidManifest.xmlの内容
	<LinearLayout
    xmlns:android="http://schemas.android.com/apk/res/android"
    android:layout_width="match_parent"
    android:layout_height="match_parent"
    android:background="#ffffd5"
    android:orientation="vertical">
	<LinearLayout
			android:layout_width="match_parent"
			android:layout_height="0dp"
			android:layout_weight="4"
			android:layout_marginTop="0dp"
	        android:orientation="horizontal" >
	        <TextView
				android:id="@+id/timerCount_text"
				android:layout_width="fill_parent"
	            android:layout_height="fill_parent"
			    android:gravity="center_horizontal|center_vertical"
				android:textColor= "@color/black"
				android:textSize="130sp"
	            android:text="00:00"
				android:layout_marginRight="10dp"
				android:layout_marginLeft="10dp"
				android:layout_marginTop="10dp"
				android:layout_marginBottom="10dp"
      			android:background="@drawable/text_design"
            />
	</LinearLayout>
	<LinearLayout
			android:layout_width="match_parent"
			android:layout_height="0dp"
			android:layout_weight="2"
			android:orientation="horizontal" >
			<Button
			    android:id="@+id/start_button"
			    android:layout_width= "fill_parent"
			    android:layout_height="fill_parent"
			    android:gravity="center_horizontal|center_vertical"
			    android:text= "@string/button.start"
      			android:textSize="50dp"
      			android:textColor= "@color/blue"
				android:layout_marginRight="10dp"
				android:layout_marginLeft="10dp"
				android:layout_marginTop="10dp"
				android:layout_marginBottom="10dp"
      			android:background="@drawable/button_design"
	      	/>

	</LinearLayout>
	<LinearLayout
			android:layout_width="match_parent"
			android:layout_height="0dp"
			android:layout_weight="2"
			android:orientation="horizontal" >
			<Button
			    android:id="@+id/Stop_button"
			    android:layout_width= "fill_parent"
			    android:layout_height="fill_parent"
			    android:gravity="center_horizontal|center_vertical"
			    android:text= "@string/button.stop"
      			android:textSize="50dp"
      			android:textColor= "@color/blue"
				android:layout_marginRight="10dp"
				android:layout_marginLeft="10dp"
				android:layout_marginTop="10dp"
				android:layout_marginBottom="10dp"
      			android:background="@drawable/button_design"
	      	/>

	</LinearLayout>
	<LinearLayout
			android:layout_width="match_parent"
			android:layout_height="0dp"
			android:layout_weight="2"
			android:orientation="horizontal" >
			<Button
			    android:id="@+id/Reset_button"
			    android:layout_width= "fill_parent"
			    android:layout_height="fill_parent"
			    android:gravity="center_horizontal|center_vertical"
			    android:text= "@string/button.reset"
      			android:textSize="50dp"
      			android:textColor= "@color/blue"
				android:layout_marginRight="10dp"
				android:layout_marginLeft="10dp"
				android:layout_marginTop="10dp"
				android:layout_marginBottom="10dp"
      			android:background="@drawable/button_design"
	      	/>
	</LinearLayout>

</LinearLayout>
イメージはこんな感じです。
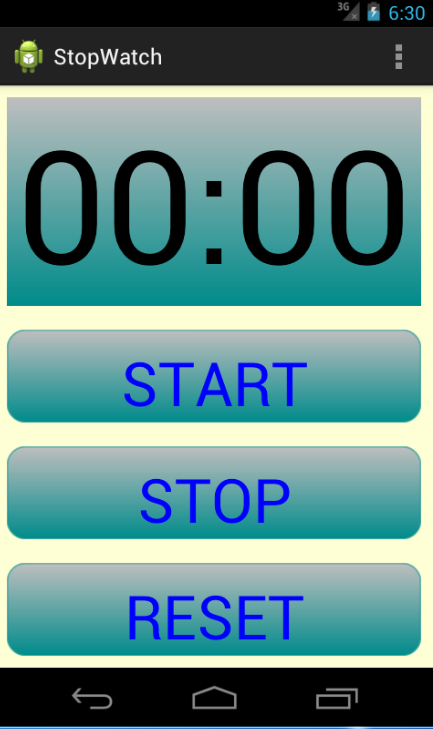
android:background="@drawable/button_design"
各ボタンで上記の設定で、無駄にボタンにはグラデーションを設定しています。
グラデーション設定も奥が深そうなのでまた別の機会に勉強します。
後気になったのはフォントサイズ!!
これ自動で調整してくれる設定がないんですねぇ~
javaソースの方でその辺も調整できるみたいなのでこれも後日調べていきたいと思います。
今回はとりあえず固定で(;´∀`)
カテゴリーへ
タイマー処理クラス作成 (ストップウォッチ)
今回はストップウォッチ機能のコアになるクラス、数字カウントクラスを作成します。
ストップウォッチの時間計算方法は、スタートが押された時間を保持します。
定期的に時間を確認するメソッドを用意する。
定期的に呼ばれるメソッド内の処理で現在時刻と、スタート時刻の差を計算して
結果を表示するようにします。
System.currentTimeMillis()で現在時刻を数値で取得できます。
表示フォーマットはまず取得したミリ秒をDateクラスに変換してやります。
Date date = new Date(System.currentTimeMillis);
後はdateをSimpleDateFormatに渡します。
SimpleDateFormat は、日付のフォーマットと解析を、同時できるクラスです。
これによって、フォーマット (日付 -> テキスト)、解析 (テキスト -> 日付)、および正規化を行うことができます。
では全体ソースを下記に記述します
package com.example.stopwatch;

import java.text.SimpleDateFormat;
import java.util.Calendar;
import java.util.Date;

import android.text.format.DateFormat;

//タイマーカウントクラス
public class TimerController{
	SimpleDateFormat sdf = new SimpleDateFormat("HH:mm:ss");
	private long myStartTime = 0;	//開始時間保持
	private long myOffsetTime = 0;	//オフセットタイム
	private long myNowTime = 0;	//再開時のオフセット

	/*
	 * コンストラクタ
	 */
	public TimerController() {
		myStartTime = 0;
		myOffsetTime = 0;
	}

	//タイマー開始
	public void start() {
		myStartTime = System.currentTimeMillis();
	}

	//タイマー停止
	public void stop() {
		myOffsetTime += System.currentTimeMillis() - myStartTime;
	}

	//タイマー再開
	public void reStart() {
		myStartTime = System.currentTimeMillis();
	}


	//タイマーリセット
	public void reset() {
		myOffsetTime = 0;
	}


	//文字列取得
	public String getDispString() {
		myNowTime = System.currentTimeMillis() - myStartTime + myOffsetTime;
		return sdf.format(new Date(myNowTime)).toString();
	}

}
Timerを使ってみる(1)で作成したクラスをベースに改造します。
ActivityクラスのTextViewなどを別のクラスで操作したい場合はContextを渡して使うのが一般的です。
よってコンストラクタの引数にContextとタイマー管理クラスを指定しています。
ループで呼ばれるpublic void run() 関数はUIスレッドとは別スレッドで動くため
UIのコントロールを操作する際にはきちんとハンドラ経由でしましょう
public void run()の中でtimeCtrl.getDispString();を呼んで
時間の文字列を取得してテキストビューにセットしています。
下記がソースです
package com.example.stopwatch;

import java.util.TimerTask;

import android.app.Activity;
import android.content.Context;
import android.os.Handler;
import android.widget.TextView;

//タイマークラス
public class MainTimerTask extends TimerTask {

	private Handler handler;	//UIスレッドハンドラ
	private Context context;	//コンテキスト

	private TimerController timeCtrl;

	//コンストラクタ
	public MainTimerTask(Context con,TimerController timerController)
	{
		this.handler = new Handler();
		this.context = con;
		this.timeCtrl = timerController;
	}


	//メインループ処理
	@Override
	public void run() {
	    handler.post(new Runnable() {
	        public void run() {
	    		String a = timeCtrl.getDispString();
	    		TextView tv = (TextView)((Activity)context).findViewById(R.id.timerCount_text);
	    		tv.setText(a);
	        }
	      });
	}
}
メイン処理は次回に説明します
カテゴリーへ
タイムゾーンについて (ストップウォッチ)
MainActivity.javaの実装をしていこうと思ったのですが、
前回作ったタイマー処理クラスの動作を確認していると、どうしても時間計算をした結果が
+9時間になってしまい、うまく表示できませんでした。orz
ちょっと調べてみようと思いググってみると
タイムゾーンという概念があって、それを考慮しないといけないみたいです。
おバカな私は全く知らなかったため、ちょっと勉強してみようと思います。
○タイムゾーンとは
各地域(国)の時刻をコンピュータの世界で使うと混乱がおきるために
コンピューターやプログラムの時計の標準時に合わせることらしいです。
標準時は、イギリスのグリニッジ天文台における基準時刻との差で表す。
日本は、韓国やインドネシア東部と同じタイムゾーンにあり、標準時は+9時間になるとのこと。
参考元:タイムゾーン - 意味・説明・解説 : ASCII.jpデジタル用語辞典
ここでSimpleDateFormatを使用して時間文字列をフォーマットしてたんですが
こいつのデフォルトのタイムゾーンがja_JPになってます。
まあ日本にいるので当然ですね。。。
次にSystem.currentTimeMillis()を使ってミリ秒を取得してるのですが
こいつのタイムゾーンが世界の標準時刻 UTCとGMTになってるので
フォーマット変換時に、+9時間のズレが発生してたってことですね。たぶんw
ってことでSimpleDateFormatのタイムゾーンをGMTにしてやると
期待通りの結果が返ってきました!(´∀`)
下記の通りにすることで、SimpleDateFormatのタイムゾーンを設定できます。
SimpleDateFormat sdf = new SimpleDateFormat("HH:mm:ss,SSS");
sdf.setTimeZone(TimeZone.getTimeZone("GMT"));
以下修正後ソース
package com.example.stopwatch;

import java.text.SimpleDateFormat;
import java.util.Date;
import java.util.Locale;
import java.util.TimeZone;

import android.util.Log;

 // タイマーカウントクラス
public class TimerController {
	private static final String TAG = "TimerController";

	SimpleDateFormat sdf = new SimpleDateFormat("HH:mm:ss,SSS");

	private long myStartTime = 0;	//開始時間保持
	private long myOffsetTime = 0;	//オフセットタイム
	private long myNowTime = 0;	//再開時のオフセット

	//コンストラクタ
	public TimerController() {
		myStartTime = 0;
		myOffsetTime = 0;

		Log.d(TAG,Locale.getDefault().toString());
		sdf.setTimeZone(TimeZone.getTimeZone("GMT"));//ここでタイムゾーン変更
	}

	//タイマー開始
	public void start() {
		myStartTime = System.currentTimeMillis();
	}

	//タイマー停止
	public void stop() {
		myOffsetTime += System.currentTimeMillis() - myStartTime;
	}

	//タイマー再開
	public void reStart() {
		myStartTime = System.currentTimeMillis();
	}

	//タイマーリセット
	public void reset() {
		myOffsetTime = 0;
	}

	//文字列取得
	public String getDispString() {
		myNowTime =  System.currentTimeMillis() - (myStartTime - myOffsetTime);
		long temp = myNowTime;
	    return sdf.format(new Date(myNowTime)).toString();
	}

}
カテゴリーへ
MainActivity.java実装 (ストップウォッチ)
MainActivity.javaの実装をしていきます。
まずは全体のソースから
package com.example.stopwatch;

import java.util.Timer;

import android.os.Bundle;
import android.os.Handler;
import android.app.Activity;
import android.view.Menu;
import android.view.View;
import android.view.View.OnClickListener;
import android.widget.Button;
import android.widget.TextView;

//MainActivityクラス
public class MainActivity extends Activity implements OnClickListener {

	private Button startButton = null;	//スタートボタン
	private Button stopButton = null;	//ストップボタン
	private Button resetButton = null;	//リセットボタン
	private TextView timerCountText = null;	//カウント表示テキスト
	private Timer mainTimer = null;	//タイマー
	private MainTimerTask mainTimerTask = null; //タイマータスククラス
	private Handler mHandler = new Handler();   //UI Threadへのpost用ハンドラ
	private TimerController timerCtrl  = null;
	private int timerState = 0;

	@Override
	protected void onCreate(Bundle savedInstanceState) {
		super.onCreate(savedInstanceState);
		setContentView(R.layout.main);

		//画面IDと紐つけ
		this.startButton = (Button)findViewById(R.id.start_button);
		this.stopButton = (Button)findViewById(R.id.stop_button);
		this.resetButton = (Button)findViewById(R.id.reset_button);

		this.timerCountText = (TextView)findViewById(R.id.timerCount_text);

		startButton.setEnabled(true);
		stopButton.setEnabled(false);
		resetButton.setEnabled(false);

		//クリックリスナー設定
		this.startButton.setOnClickListener(this);
		this.stopButton.setOnClickListener(this);
		this.resetButton.setOnClickListener(this);

		//タイマーインスタンス生成
		this.mainTimer = new Timer();

		this.timerCtrl = new TimerController();
	}

	@Override
	public void onClick(View arg0) {

		// TODO 自動生成されたメソッド・スタブ
		switch(arg0.getId()){
		case R.id.start_button:
			if(timerState == 0) {
				startButton.setEnabled(false);
				stopButton.setEnabled(true);
				resetButton.setEnabled(false);
				timerState = 1;
				timerCtrl.start();
				mainTimerTask = new MainTimerTask(this,this.timerCtrl);
				mainTimer = new Timer(true);
				mainTimer.schedule(mainTimerTask, 100, 100);
			}
			break;
		case R.id.stop_button:
            if(mainTimer != null) {
    			if(timerState == 1){
    				startButton.setEnabled(true);
    				stopButton.setEnabled(false);
    				resetButton.setEnabled(true);
	            	timerState = 0;
	            	mainTimer.cancel();
	            	mainTimer = null;
	    			timerCtrl.stop();
    			}
            }
            break;
		case R.id.reset_button:
			if(timerState == 0){
				startButton.setEnabled(true);
				stopButton.setEnabled(false);
				resetButton.setEnabled(false);
				this.timerCtrl = new TimerController();
				this.timerCountText.setText("00:00:00:00");
			}
			break;
		default:
		}
	}
}
各ボタンのコントロールを取得して、各ボタンのクリックイベントを実装しています。
後はTimerControllerを操作して時間の計算をしています。
これを少し改造して、一度ストアーに登録して反応をみてみようかなぁー(笑)
カテゴリーへ